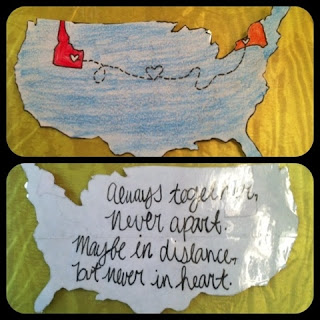
Well, fellow bloggers, I have made another craft (surprise, surprise.) and I thought I would just share with you all how I made it. I've seen other things like this before, the idea isn't 100% mine, but I just thought I would make a little step-by-step guide on how to make it. But first, a picture on what exactly is being made.
And I know that in the picture, my coloring job looks verrrrrry sub-par, but I promise it actually looks way good in person!
Materials Needed
Paper
Black Marker (I prefer to use a Sharpie Pen.)
Pencil
Colored Pencils/Markers/Crayons
Clear Mailing Tape
Scissors or Exact-o Knife (Either one works fine.)
Step One:
Print out a map of the United States of America that has the states outlined, preferably blank (no labels of the states.) If you are making one for a missionary who is out of the country, then print out one of the United States and one of his country. The print-outs should look something like this:
Step Two:
Place a piece of paper over the outline of the country, and trace the outline of the country and your state that you are from. If your missionary is serving in the United States, outline your state and his as well. If your missionary is from another country, outline the continent he is in as well as the country he is in. Once everything is outlined, put a heart over your hometown and the town that your missionary is currently living in.
It should look like this:
Step Three:
After you have traced the outline of the country/continent and the state/country that you and your boyfriend are both currently living in, draw a dotted-line from your hometown to your missionary's current hometown with a pencil, and then trace over that with a pen. (I do this so that I can change the design of the dotted line until I find the desired look.) I add loops and hearts and cute things like that to make it look more crafty.
It should look something like this:
Step Four:
After you have drawn a dotted line from the country/continent and the state/country that you and your boyfriend are both currently living in, it's time to color it. This step is optional, though I think it adds a little more oomph to the craft. You can choose whichever colors you would like, I chose blue, red, and orange because orange and blue are my boyfriend's favorite color, and I like how red and blue look together. But that's just me. I leave the hearts blank, but you can feel free to fill them in with another color.
They should look something like this:
Step Five: If your hometown and your elder's hometown are in the same country, cut out the country. If not, and your craft looks more like the first picture above, do not cut them out. Leave them as they are. In fact, if your boyfriend lives outside of the country, at this point, your craft is finished (unless you'd like to "Poor Girl Laminate" it. If your boyfriend is serving within the country, cut it out around the perimeter.
It should look something like this:
Step Six:
Now is your chance to write any extra things on your little project. As in signing your name or writing a cute quote. I wrote "Always together, never apart. Maybe in distance, but never in heart." on the back of mine. If you do not feel the need to "laminate" your project, then you can feel free to end it here. But as for myself, I like to have my projects have a laminated look and feel to them.
Step Seven:
It's the moment we've all been waiting for, Poor Girl Laminating time! Take your project, and on the back side (the side that is either blank or has words written on it) and place a piece of clear mailing tape, sticky side down, onto the paper. If needed, place another piece of the tape under that one and so on until the entire side of this paper is covered.
At this point, it should look something like this:
Now for the next side. Do the same steps that you took on the side with the writing, on the side with the colored country outline.
Now, it should look something like this:
Step Eight:
Cut off all excess tape around the edges of the cutout. Now it has that laminated look and feel that I like so much.
In the end, it should look like this:
If your project was the other, it should look like this in the end:
Thank you for reading! I hope that the instructions were easy to understand and that you were able to make a cute little project! Comment any questions or suggestions you might have. Thanks again!


No comments:
Post a Comment